One Docker Bake Pipeline to Rule Them All - Part II: Understanding Container Image Signing, Attestations, and K8s Admission Control

In this part, I will not work on the pipeline. I will locally explore the complete workflow of container supply chain security: signing images with cosign, creating vulnerability and provenance attestations, and enforcing signature verification in Kubernetes using Kyverno policies.
You can use the files in https://github.com/k-candidate/understanding-docker-image-signing to follow along.
The Big Picture
When you push an image to a registry, you want to prove three things to anyone who pulls it:
- Authenticity: This image came from your build system, not someone else’s
- Integrity: This image hasn’t been tampered with since you built it
- Transparency: Here’s what’s in it, how it was built, and what vulnerabilities it has
The tools:
- cosign: Signs images and attestations using public/private key pairs (or keyless with OIDC)
- Trivy: Scans images for vulnerabilities and can produce attestations in standard formats
- docker buildx: Produces provenance attestations (SLSA) that describe how the image was built
- Kyverno: Enforces image signature verification policies in Kubernetes clusters
The artifacts:
- Image signature: A cryptographic signature over the image digest
- Vulnerability attestation: A signed statement about what vulnerabilities exist in the image
- Provenance attestation: A signed statement about how the image was built (source repo, commit, build args, etc.)
All of these get stored in the registry alongside your image, referenced by digest.
Part 1: Prerequisites and Setup
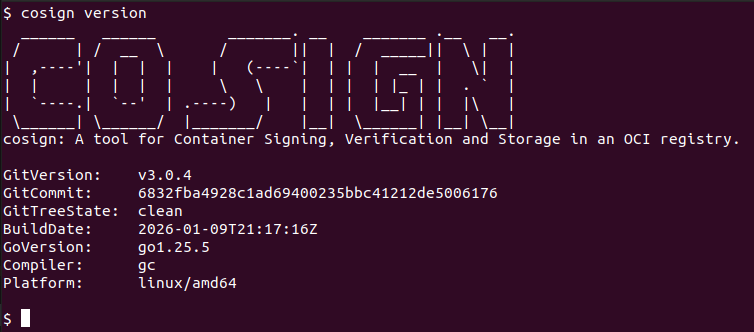
Installing cosign
See https://docs.sigstore.dev/cosign/system_config/installation/.
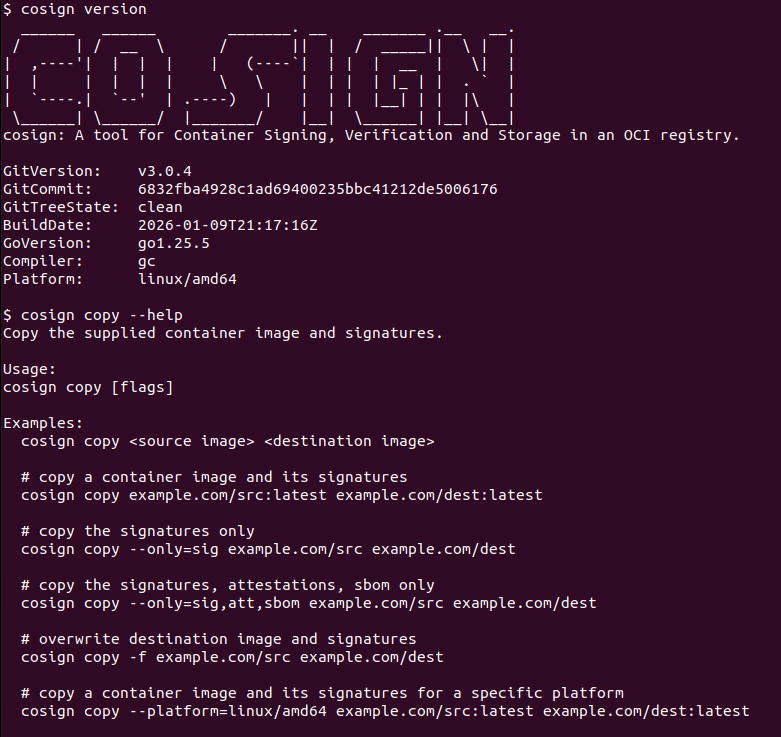
At the moment of writing, I have cosign v3.0.4.
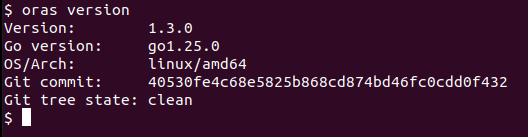
Installing oras
We’ll use oras to copy images with all their artifacts (signatures, attestations) between registries: https://oras.land/docs/installation/.
I am running oras 1.3.0:
Why oras? The cosign copy command was deprecated in February 2026 (PR sigstore/cosign#4681). One of the recommended replacements is oras copy -r (recursive copy) which copies images with all their referrers (signatures, attestations, etc.). I started working on this before they made the PR: what a headache it was! They deprecated it before removing the documentation. I mean the copy subcommand is still there, but it does not do what it’s supposed to do. 24h later after I started working on this, they made that PR. ಠ_ಠ
Docker Registry Setup
Ensure you’re logged in to Docker Hub:
docker login
Local Registry Setup
Start a local registry to simulate your CI/CD environment where images are built and signed:
# Start a local registry
docker run -d -p 5000:5000 --restart=always --name registry registry:2

# Verify it's running
curl http://localhost:5000/v2/_catalog
This local registry represents your internal build system. In production, this might be your private registry in CI/CD where images are built, signed, and initially stored before being promoted to production registries like ECR, GCR, or ACR.
The objective here is to show that the image and its artifacts (signature and signed attestations) get copied.
Understanding cosign signing modes
Keypair mode: You generate a private/public key pair. You keep the private key secret, publish the public key. Anyone with the public key can verify signatures you made with the private key.
Keyless mode: Uses OIDC (OpenID Connect) and certificate transparency. You authenticate with GitHub, Google, etc., cosign gets a short-lived certificate tied to your identity, signs with that, and stores the signature + certificate in a transparency log. No long-lived keys to manage, but requires internet access to verify (unless you wanna host your own Rekor and Fulcio).
For CI/CD, keyless is the modern approach. For local testing and understanding, keypair is simpler. I will use keypair mode.
Generating a keypair
# Generate a keypair (you'll be prompted for a password. Leave it empty for simplicity)
cosign generate-key-pair

# This creates:
# - cosign.key (private key, keep this secret)
# - cosign.pub (public key, share this)
The private key is what you’ll use to sign. The public key is what anyone uses to verify your signatures.
I wanted to know what type of cryptography it is using so I made a simple python script:
from cryptography.hazmat.primitives import serialization
from cryptography.hazmat.primitives.asymmetric import rsa, ec
from cryptography.hazmat.backends import default_backend

def main():
    with open('cosign.pub', 'rb') as f:
        key = serialization.load_pem_public_key(f.read(), backend=default_backend())

    if isinstance(key, rsa.RSAPublicKey):
        public_numbers = key.public_numbers()
        print("RSA key")
        print(f"Modulus size: {key.key_size} bits")
        print(f"Public exponent: {public_numbers.public_exponent}")
        print(f"Modulus (first 20 hex digits): {hex(public_numbers.n)[:40]}...")
    elif isinstance(key, ec.EllipticCurvePublicKey):
        curve = key.curve
        print("EC key")
        print(f"Curve: {curve.name}")
        print(f"Key size: {curve.key_size} bits")
        public_numbers = key.public_numbers()
        print(f"Public point: x={public_numbers.x}, y={public_numbers.y}")
    else:
        print("Other/Unsupported")


if __name__ == "__main__":
    main()
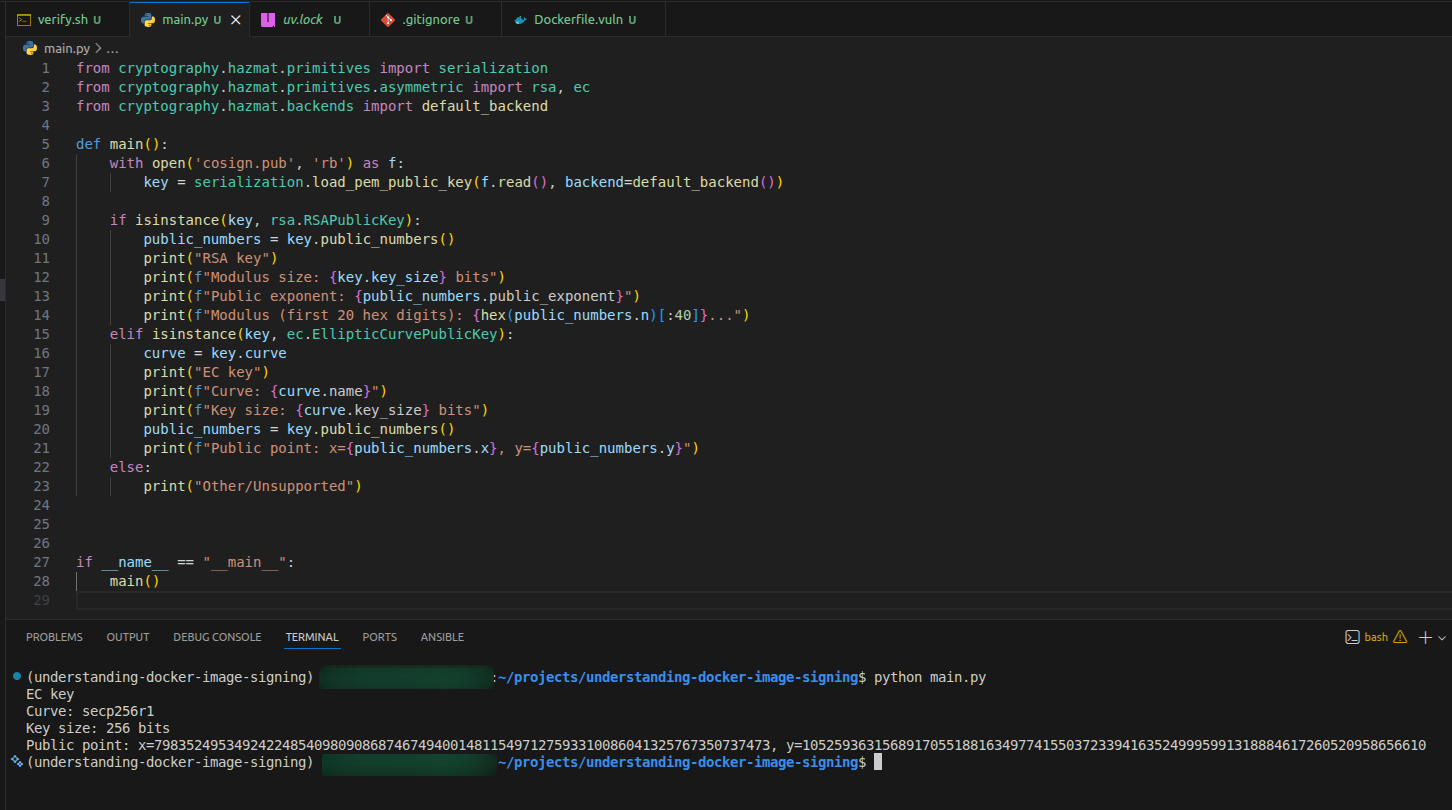
So the keypair uses Elliptic Curve cryptography, specifically the secp256r1 curve with a 256 bits key.
Part 2: Building and Signing Images Locally
We’ll create two different images: one to sign, and one to leave unsigned for testing. We build and sign them in the local registry first (simulating CI/CD), then copy to Docker Hub (simulating production registry promotion).
Build the signed image (Alpine-based)
cat > Dockerfile.signed <<'EOF'
FROM alpine:latest
RUN echo "This image will be signed"
CMD ["sh", "-c", "echo 'Signed image running' && sleep infinity"]
EOF

docker build -f Dockerfile.signed -t localhost:5000/myapp:v1 .
docker push localhost:5000/myapp:v1
Sign the image in the local registry
# Sign the image using your private key
cosign sign --key cosign.key localhost:5000/myapp:v1

# You'll be prompted for the key password
# Cosign will push the signature to the local registry as a separate artifact
What just happened? Cosign:
- Pulled the image manifest and computed its digest
- Created a signature over that digest using your private key
- Pushed that signature to the local registry as an OCI artifact linked to the image digest
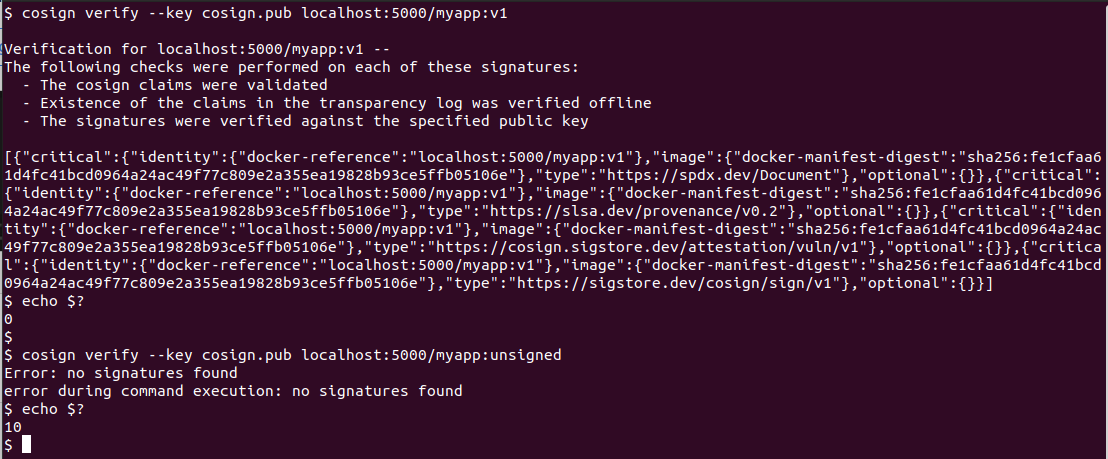
Verify the signature locally
# Verify using the public key
cosign verify --key cosign.pub localhost:5000/myapp:v1

# If valid, you'll see output like:
# Verification for localhost:5000/myapp:v1 --
# The following checks were performed on each of these signatures:
#   - The cosign claims were validated
#   - The signatures were verified against the specified public key
Inspect the signature artifact
# Use cosign tree to see the signature relationship
cosign tree localhost:5000/myapp:v1

# You'll see output like:
# 📦 Supply Chain Security Related artifacts for an image: localhost:5000/myapp:v1
# └── 🔗 Signatures for an image tag: localhost:5000/myapp:v1
#    └── 🍒 sha256:... (the signature artifact)
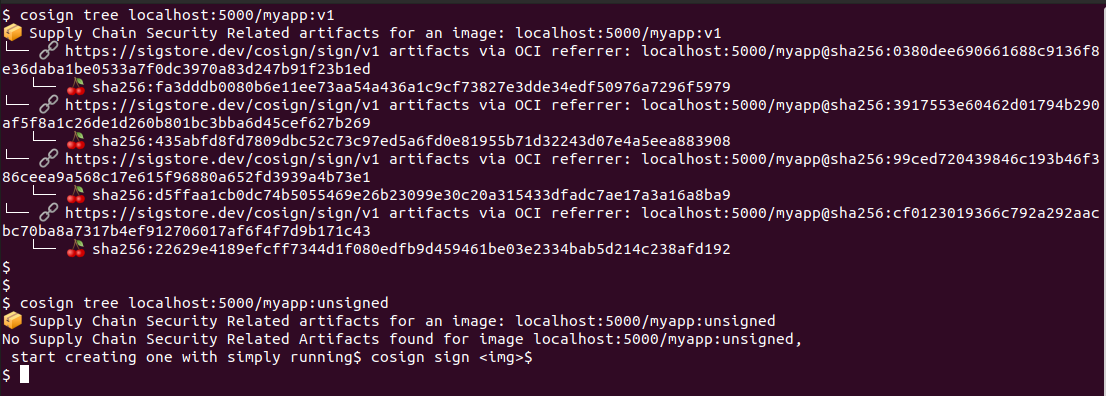
The signature is stored as a separate OCI artifact that references the image digest using the OCI referrers specification. More on that here: https://github.com/opencontainers/distribution-spec/blob/main/spec.md:
Referrers List: a list of manifests with a subject relationship to a specified digest. The referrers list is generated with a query to a registry.
This was added in version 1.1 of the OCI distribution spec. So you have to check if the solution you use (and is version) does support it or not. For example AWS ECR, Azure ACR, GCP Artifact Registry, Artifactory, and Harbor do support it.
Build an unsigned image (Ubuntu-based)
For testing policy enforcement, we need an unsigned image that’s different from the signed one. Remember that using a different tag isn’t enough since cosign signs the image digest, not the tag.
cat > Dockerfile.unsigned <<'EOF'
FROM ubuntu:latest
RUN echo "This image will NOT be signed"
CMD ["sh", "-c", "echo 'Unsigned image running' && sleep infinity"]
EOF

docker build -f Dockerfile.unsigned -t localhost:5000/myapp:unsigned .
docker push localhost:5000/myapp:unsigned
Do not sign this image. We’ll use it to test that Kyverno blocks unsigned images.
Verify you have two distinct images locally
# Check the signed image (should show signatures)
cosign tree localhost:5000/myapp:v1

# Check the unsigned image (should show no signatures)
cosign tree localhost:5000/myapp:unsigned

# Try to verify the unsigned image (should fail)
cosign verify --key cosign.pub localhost:5000/myapp:unsigned
# Expected: Error: no signatures found
Part 3: Copying Images to Docker Hub (Production Registry)
Now we’ll copy both images from the local registry to Docker Hub, simulating the promotion from CI/CD to production. The signed image will carry its signature with it; the unsigned image will not.
Copy the signed image with its signature
# Copy the signed image and all its artifacts (signature) to Docker Hub
oras copy -r --from-plain-http localhost:5000/myapp:v1 docker.io/kcandidate/myapp:v1
The -r (recursive) flag ensures the signature artifact is copied along with the image.
Copy the unsigned image
# Copy the unsigned image to Docker Hub
oras copy -r --from-plain-http localhost:5000/myapp:unsigned docker.io/kcandidate/myapp:unsigned
Verify signatures in Docker Hub
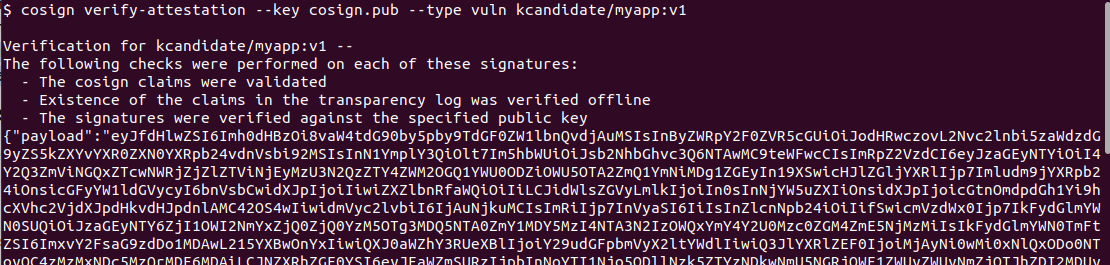
# Check the signed image on Docker Hub (should show signatures)
cosign tree kcandidate/myapp:v1

# Verify the signature works on Docker Hub
cosign verify --key cosign.pub kcandidate/myapp:v1

# Check the unsigned image on Docker Hub (should show no signatures)
cosign tree kcandidate/myapp:unsigned

# Try to verify the unsigned image (should fail)
cosign verify --key cosign.pub kcandidate/myapp:unsigned
# Expected: Error: no signatures found
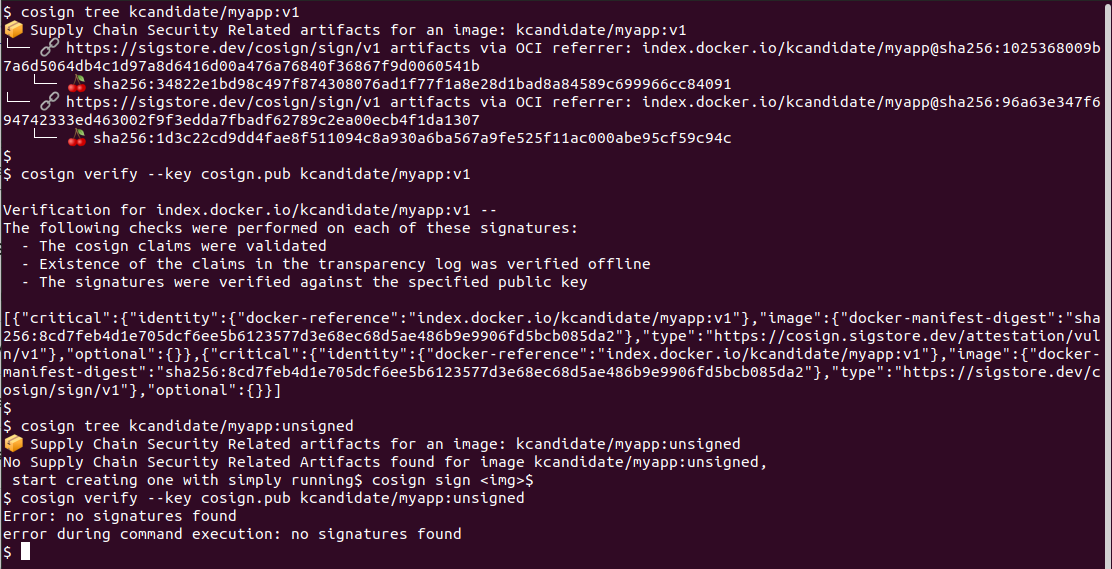
So this proves that the signature was copied alongside the image.
Key insight: The signature is cryptographically bound to the image’s digest, not to the registry host. This means a signature created in localhost:5000 is still valid when the image is in docker.io. This is exactly how production works: sign once in CI, verify everywhere the image runs.
Part 4: Attestations
An attestation is a signed statement about something. For images, common attestations are:
- Vulnerability attestation: “I scanned this image and found these CVEs”
- Provenance attestation: “I built this image from this source at this commit with these tools”
Attestations use the in-toto format (a standard for supply chain metadata) and can be signed with cosign. More information here:
- https://docs.sigstore.dev/cosign/verifying/attestation/
- https://in-toto.io/
- https://github.com/in-toto/in-toto
Creating a vulnerability attestation with Trivy
Trivy can scan an image and output results in multiple formats. I am going with COSIGN_VULN. More info here:
- https://trivy.dev/docs/latest/supply-chain/attestation/vuln/
- https://github.com/sigstore/cosign/blob/8f1cd80ef8bbc60e47f9256692cb896aae5d8dd5/specs/COSIGN_VULN_ATTESTATION_SPEC.md
- https://github.com/in-toto/attestation/blob/53a5c9d56a73efd4587dbd2400f2d94ffe2c494f/spec/predicates/vulns_02.md
# Install trivy if you don't have it
# See https://trivy.dev/docs/latest/getting-started/installation/

# Scan and create a vulnerability attestation for your signed image
trivy image --format cosign-vuln --output vuln-report.json localhost:5000/myapp:v1

# Attach and sign the attestation
cosign attest --key cosign.key --predicate vuln-report.json --type vuln localhost:5000/myapp:v1
What happened:
- Trivy scanned the image and produced a JSON document describing vulnerabilities
- Cosign wrapped that JSON in an in-toto attestation envelope
- Cosign signed the attestation with your private key
- Cosign pushed the signed attestation to the local registry (similar to how signatures are stored)
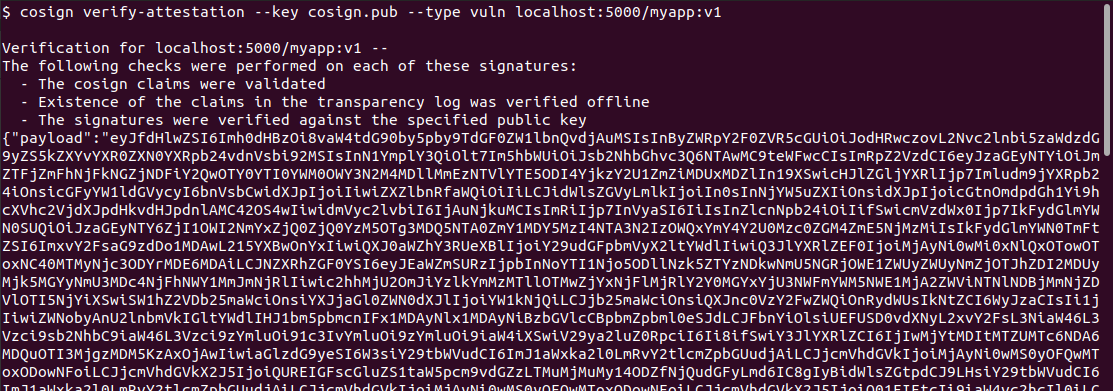
Verifying and inspecting attestations
# Verify the attestation signature
cosign verify-attestation --key cosign.pub --type vuln localhost:5000/myapp:v1

# This outputs the full attestation JSON, which includes:
# - The predicate (your vulnerability report)
# - Metadata about who signed it and when
# - The signature itself
To actually read the attestation:
# Verify and extract just the predicate (the actual vulnerability data)
cosign verify-attestation --key cosign.pub --type vuln localhost:5000/myapp:v1 | jq -r '.payload' | base64 -d | jq '.predicate'

# This shows you the actual Trivy scan results
The attestation is stored separately from the image signature. Both are in the registry, both reference the same image digest, but they’re different artifacts.
If this is the first time that you’re dealing with this, it might be confusing, so I’ll repeat it for clarity:
- there’s the image
- there’s the signature of the image
- there’s the attestation (in this case a vuln scan attestation)
- and then there’s the signature of the attestation
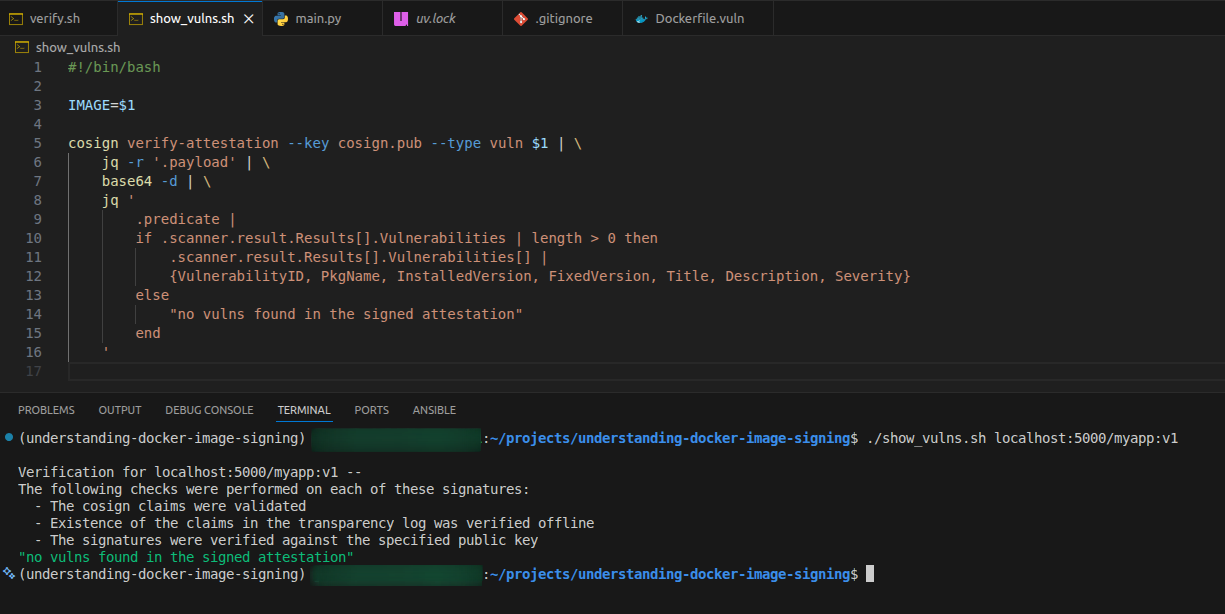
I made a script to get the important information from the signed vuln scan attestation (it’s in the repo I mentioned at the top of this blog post):
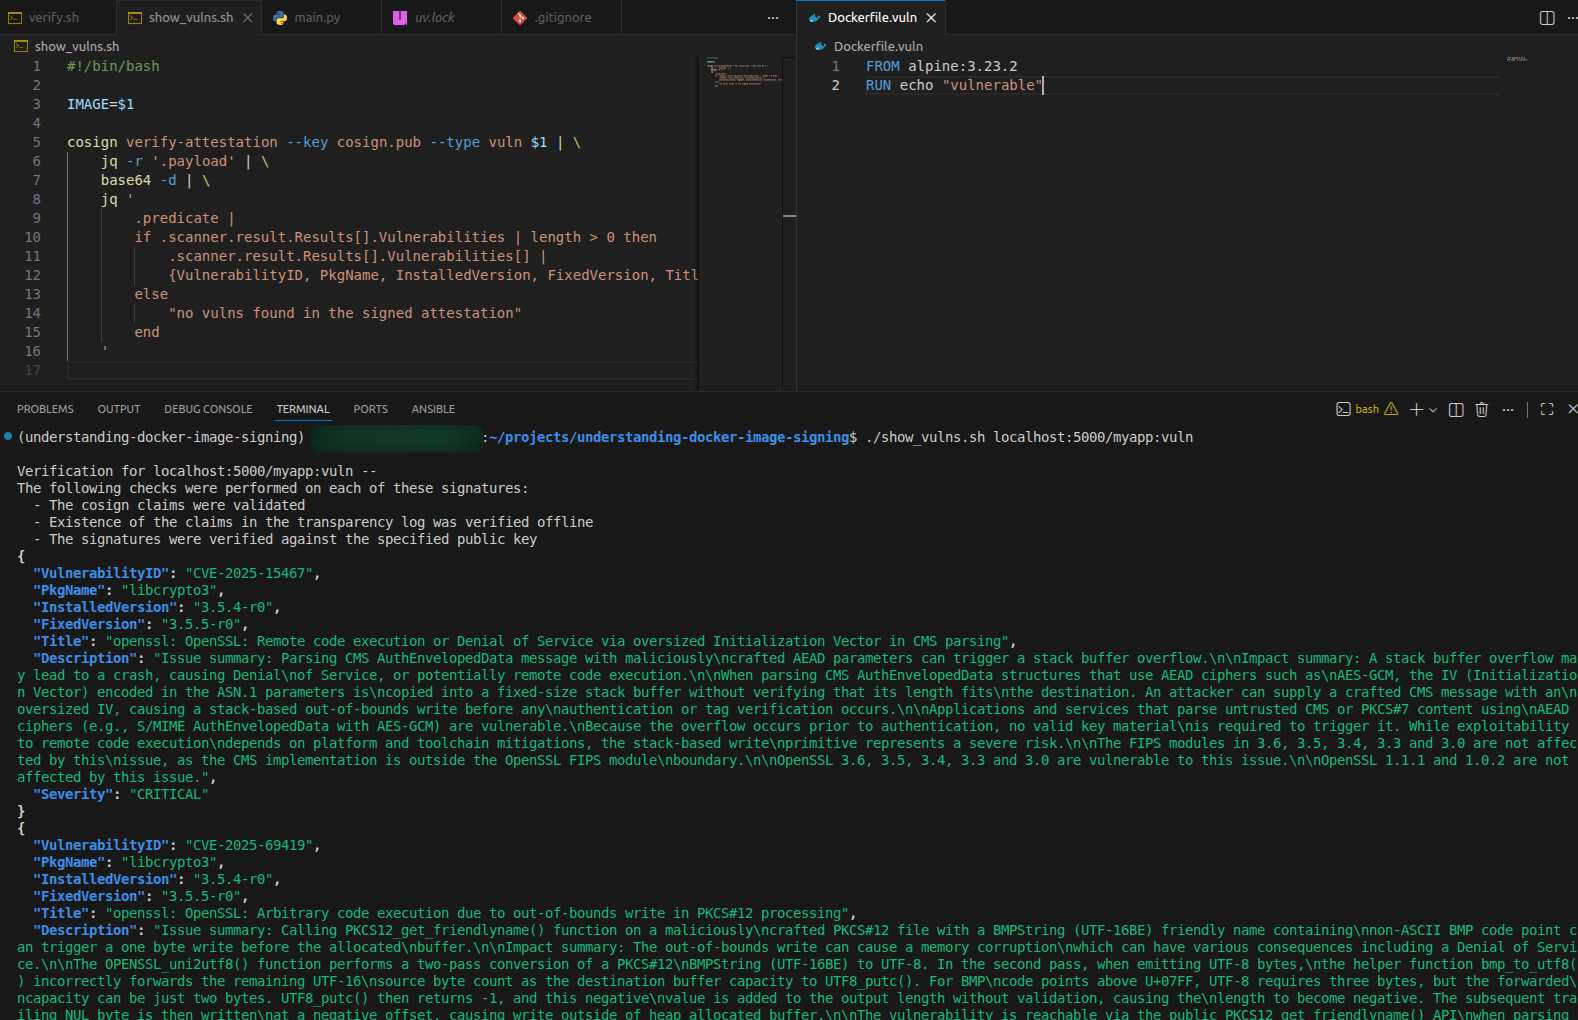
I made a vulnerable (on purpose) variant of the image just to show how the output looks like:
Now you might ask: why would I want this vuln scan attestation?! After a week/month/quarter of the container running in production, that scan information is outdated!
If you ask that, I know you’re following this long blog post. Here’s the why: this does not replace runtime scanning. There are 2 different things:
- Runtime Scanning: post-deployment
- Purpose: Reactive monitoring to detect threats after a container has been deployed.
- Timing: Continuous monitoring during runtime.
- Container Image Scanning: pre-deployment
- Purpose: Proactive analysis to find known vulnerabilities, misconfigurations, or secrets in container images.
- Timing: Done before deployment (build time). Both are necessary.
You might say Hmmm. But why keep the signed vuln scan attestation?.
It depends on what industry you’re in. Imagine you are in a higly regulated industry (finance or healthcare). Now shoe-shift: put yourself in the shoes of an Auditor. That signed vuln scan attestation is what you present to the Audotor(s) to prove to them that when the container image was built and deployed to production (within reasonable time: minutes or hours or one week), it was clean.
Copying attestations to Docker Hub
When you copy the image to Docker Hub with oras copy -r, the attestations come along:
# This will copy the image, signature, AND attestations
oras copy -r --from-plain-http localhost:5000/myapp:v1 docker.io/kcandidate/myapp:v1

# Verify the attestation exists on Docker Hub
cosign verify-attestation --key cosign.pub --type vuln kcandidate/myapp:v1
Part 5: Provenance Attestations
Provenance describes how an image was built. It’s part of SLSA (Supply chain Levels for Software Artifacts), a framework for supply chain security. More info here:
A provenance attestation includes:
- The source repository and commit SHA
- The build command and environment
- Build inputs (Dockerfile, build args, etc.)
- The builder identity
Generating provenance with docker buildx
Docker buildx can automatically generate SLSA provenance when you build. Let’s build a new version of our signed image with provenance:
# Build with provenance (max mode includes detailed information)
docker buildx build \
  -f Dockerfile.signed \
  --provenance=mode=max \
  --tag localhost:5000/myapp:v2 \
  --push \
  .

# This automatically generates and attaches a provenance attestation
Note: --push is required for attestations. Local builds don’t produce attestations that persist.
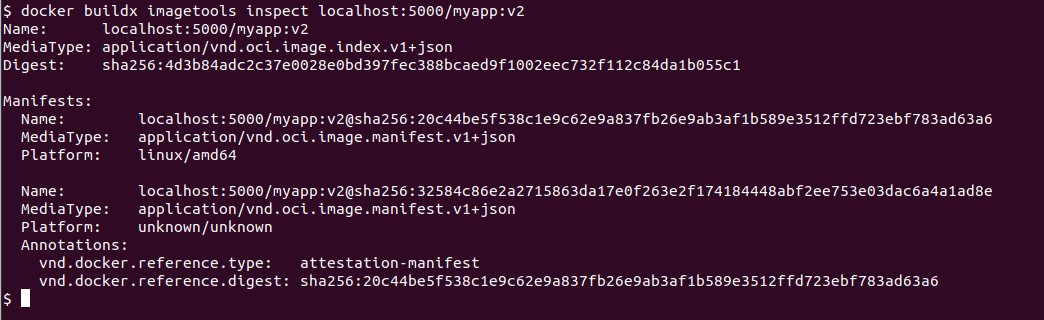
Inspecting provenance
The provenance generated by docker buildx is stored as an attestation, but it’s not signed by cosign. It’s created and attached by buildx itself.
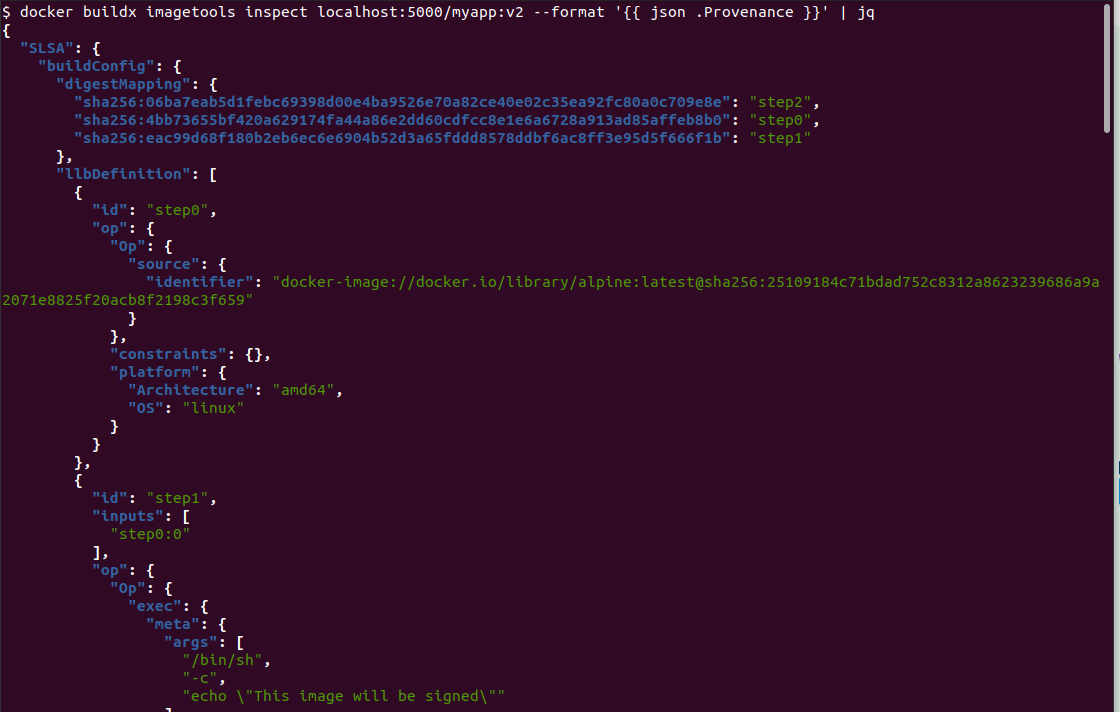
# Inspect the buildx-generated provenance
docker buildx imagetools inspect localhost:5000/myapp:v2 --format '' | jq

# Or see it in the full manifest
docker buildx imagetools inspect localhost:5000/myapp:v2
If you want to sign the provenance attestation (so it’s cryptographically verifiable with your key), you can extract it and re-attach it with cosign using the full SLSA provenance type URL:
# Extract the provenance
docker buildx imagetools inspect localhost:5000/myapp:v2 --format '' > provenance.json
# Sign and attach as a cosign attestation using the SLSA provenance type
cosign attest --key cosign.key --predicate provenance.json --type https://slsa.dev/provenance/v0.2 localhost:5000/myapp:v2
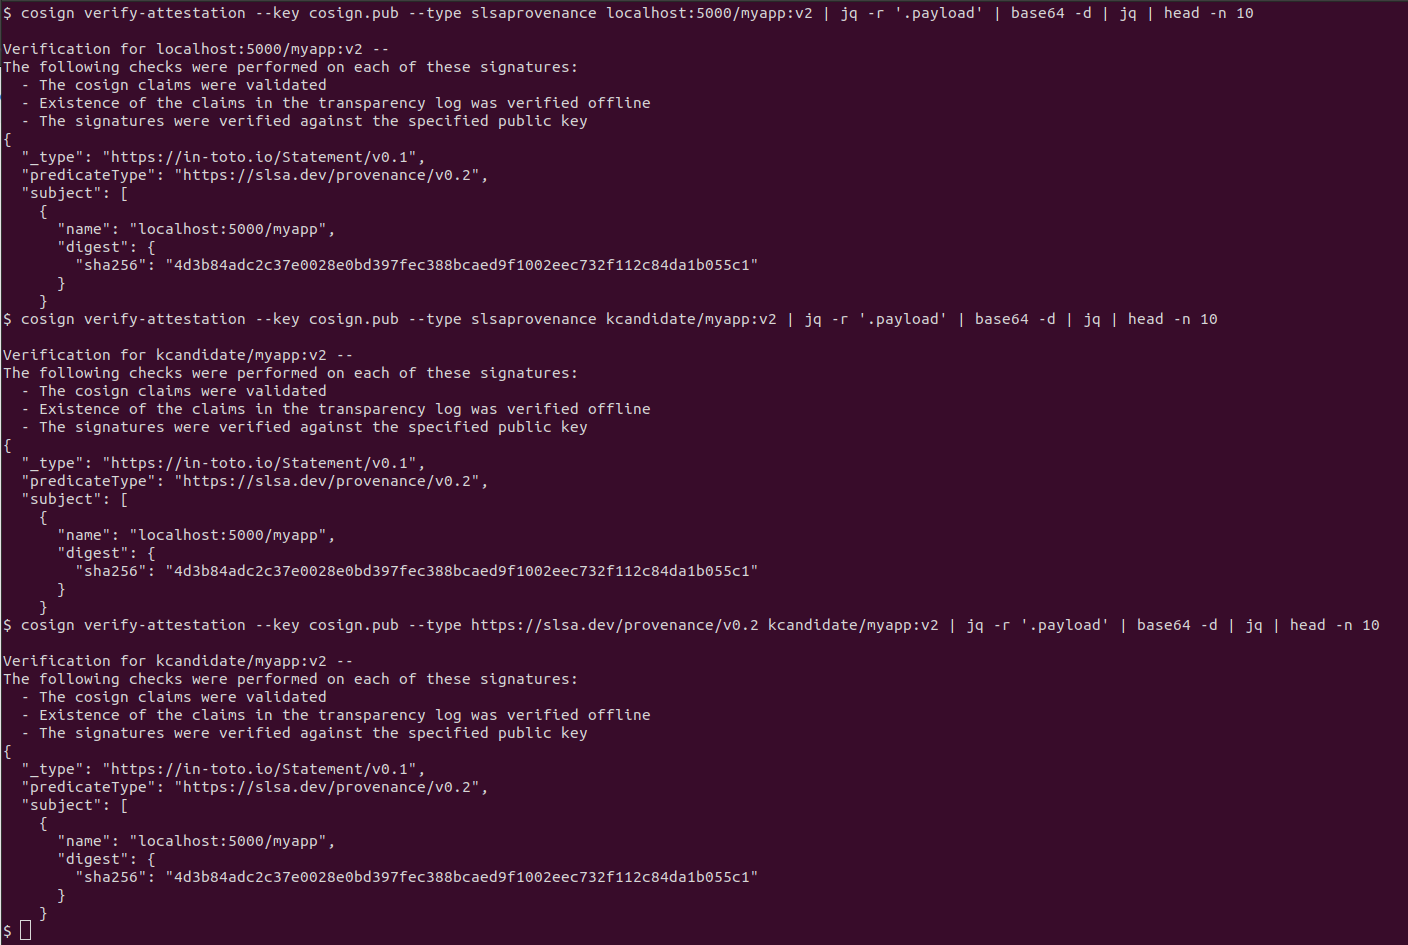
# Now you can verify it with cosign
cosign verify-attestation --key cosign.pub --type slsaprovenance localhost:5000/myapp:v2 | jq -r '.payload' | base64 -d | jq
Note: slsaprovenance is shorthand for the full type https://slsa.dev/provenance/v0.2. When attesting, use the full URL; when verifying, either form works. This weird quirk took me some time to troubleshoot
Copying to Docker Hub with all attestations
# Copy the v2 image with buildx provenance and signed attestation
oras copy -r --from-plain-http localhost:5000/myapp:v2 docker.io/kcandidate/myapp:v2

# Verify on Docker Hub
cosign verify-attestation --key cosign.pub --type slsaprovenance kcandidate/myapp:v2
The provenance JSON is extensive. Key fields:
buildConfig: The build command, args, Dockerfile contentmaterials: base imagesmetadata: Build start/end time, completeness info, and git repo + commit if available
Where does the git repo and commit come from?
The metadata field is populated automatically by buildx. It will include your source repository and the commit SHA, if buildx has git context at build time.
Buildx has git context when two conditions are met: the build runs inside a git repository, and the .git directory is accessible to the build context. When both are true, buildx adds that information.
In GitHub Actions this happens naturally: the checkout action gives buildx a full git clone. On your laptop it works too, as long as you run the build from inside the repo and the .git folder is part of the build context. No bake file changes needed. Buildx detects git context on its own.
What provenance gives you
Provenance lets you answer:
- “Was this image built from the source repo I expected?”
- “What commit was used?”
- “Were there any unexpected build args or modifications?”
- “Did the build happen in a trusted environment (the builder id)?”
This is important for supply chain attacks.
Part 6: Combining Everything
In production, you’ll:
- Build the image with provenance
- Sign the provenance attestation
- Scan it with Trivy
- Create a signed vulnerability attestation
- Sign the image itself
- Store everything in the registry
Let’s do this end-to-end locally:
# 1. Build with provenance
docker buildx build \
  --provenance=mode=max \
  --tag localhost:5000/myapp:v1 \
  --push \
  -f Dockerfile.signed \
  .

# 2. Extract and sign the provenance
docker buildx imagetools inspect localhost:5000/myapp:v1 --format '' > provenance.json
cosign attest --key cosign.key --predicate provenance.json --type https://slsa.dev/provenance/v0.2 localhost:5000/myapp:v1

# 3. Scan with Trivy and create attestation
trivy image --format cosign-vuln --output vuln.json localhost:5000/myapp:v1

# 4. Sign the vulnerability attestation
cosign attest --key cosign.key --predicate vuln.json --type vuln localhost:5000/myapp:v1

# 5. Sign the image itself
cosign sign --key cosign.key localhost:5000/myapp:v1
Now your image has:
- The image itself
- Provenance attestation (from buildx, signed by you)
- Vulnerability attestation (from Trivy, signed by you)
- Image signature (made by you)
Verifying everything
# Verify the image signature
cosign verify --key cosign.pub localhost:5000/myapp:v1

# Verify and view the provenance attestation
cosign verify-attestation --key cosign.pub --type slsaprovenance localhost:5000/myapp:v1 | jq -r '.payload' | base64 -d | jq

# Verify and view the vulnerability attestation
cosign verify-attestation --key cosign.pub --type vuln localhost:5000/myapp:v1 | jq -r '.payload' | base64 -d | jq
Part 7: Keyless Signing (OIDC)
For CI/CD, keyless signing is cleaner. Instead of managing private keys, you use your identity provider (GitHub, Google, etc.). But now you have to manage new infrastructure: Rekor and Fulcio.
Why not use the public Rekor? It depends on your environment and your compliance norms: maybe you are in an airgapped environment, or you do now want to depend on something that can go down and that you do not have control over it, or you do not want to deal with analyzing the information leak risk…
In github.com’s GitHub Actions, keyless signing works automatically with the GitHub OIDC token. No keys to store in secrets.
github.com vs GitHub Enterprise
Keyless signing with OIDC works on github.com out of the box. GitHub Actions on github.com exposes an OIDC token automatically, cosign picks it up, and the certificate it gets is tied to your GitHub identity (e.g., https://github.com/your-org/your-repo/.github/workflows/your-workflow.yaml).
GitHub Enterprise (self-hosted) is a different story. The OIDC token is available, but the certificate it produces is signed by your GitHub Enterprise instance, not by the public Sigstore infrastructure. This means:
- Rekor (the public transparency log) won’t work as-is. You’d need to run your own Rekor instance, or skip the transparency log entirely.
- The Fulcio certificate authority (the service that issues the short-lived certificates) also needs to be self-hosted, or you fall back to keypair signing.
So for GitHub Enterprise, unless you’ve set up your own Sigstore infrastructure (Fulcio + Rekor), keypair signing is the pragmatic choice. The keypair approach works identically on github.com and self-hosted: no OIDC, no transparency logs, just a private key that signs and a public key that verifies.
Part 8: What Gets Stored Where
This is important for understanding what you’ll see in your registry:
Registry: localhost:5000

Repository: myapp
  - Tag: v1 (the actual image)

Linked via OCI referrers (by digest):
  - Image signatures (type: cosign signature)
  - Attestations (type: in-toto attestation)

Each attestation has a type:
  - SLSA provenance (predicateType: slsaprovenance)
  - Vulnerability scan (predicateType: vuln)

Each is individually signed and linked to the image digest
You can see the full tree with:
# Show all linked artifacts
cosign tree localhost:5000/myapp:v1

# This displays the image and all signatures/attestations
# in a hierarchical view showing the OCI referrer relationships
Part 9: Practical Verification Workflows
When someone wants to deploy your image, they should:
- Verify the signature to ensure it came from your pipeline
- Check the provenance to ensure it was built from the expected source
- Review the vulnerability attestation to decide if the CVEs are acceptable
You should have this automated. Please don’t do it manually. If you are reading this, you probably already have automated deployments (GitOps or not).
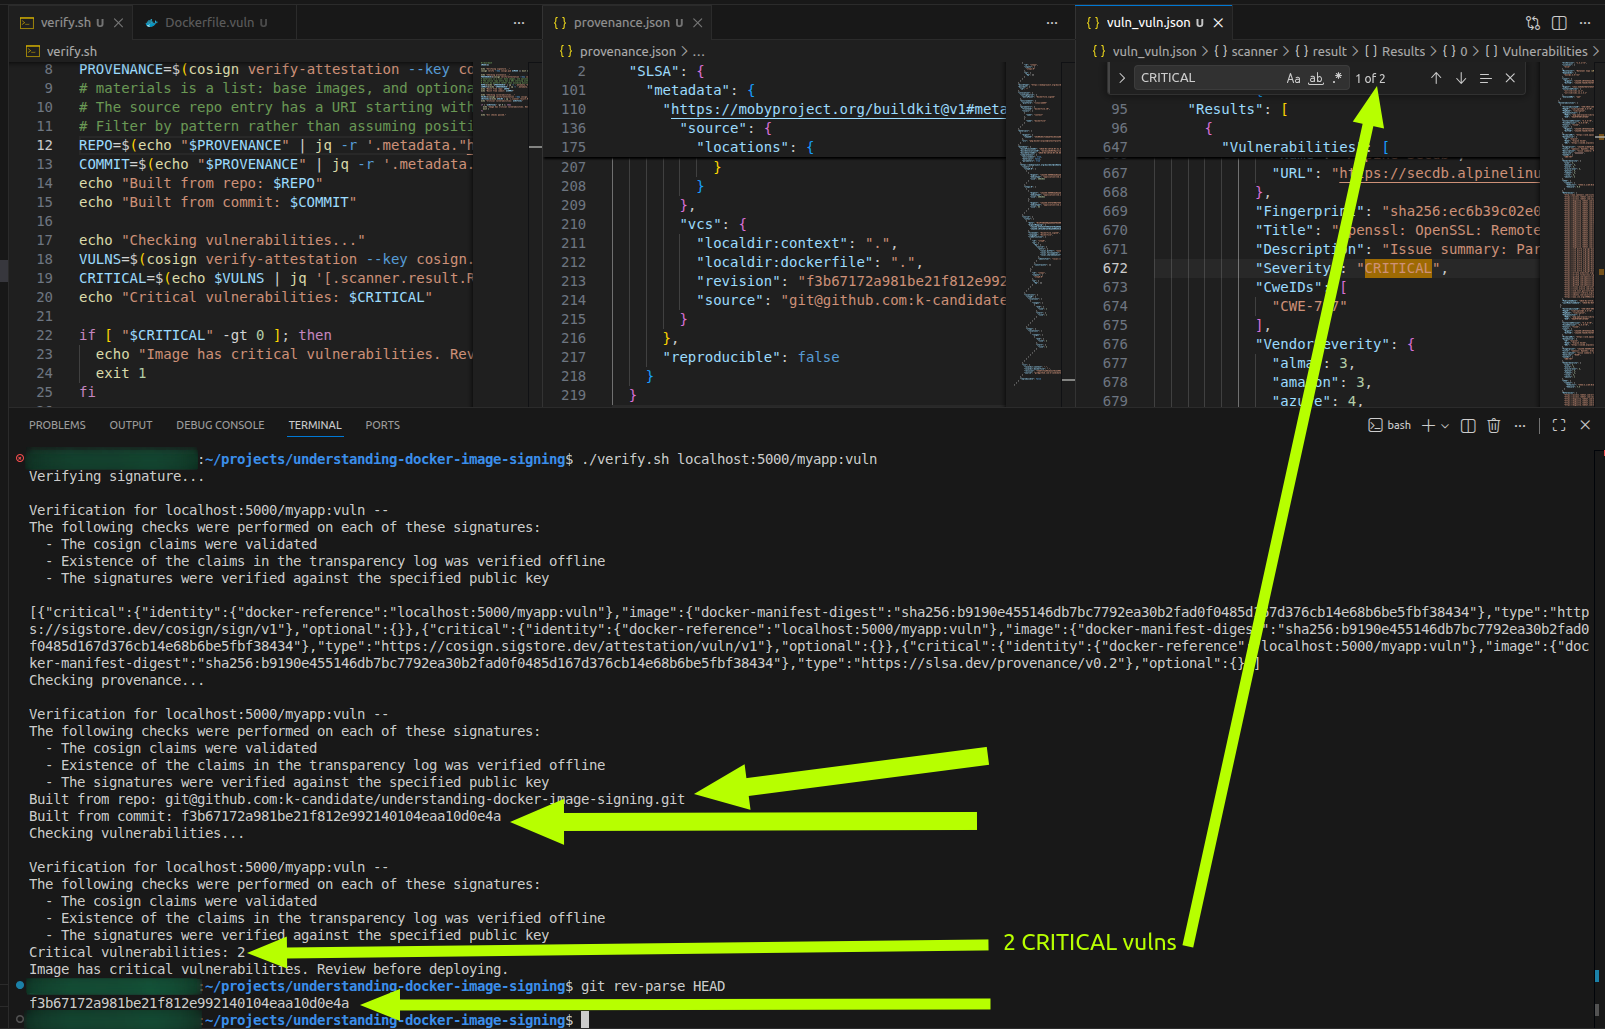
Example script (it’s in the repo I mentioned at the top of the blog post):
#!/bin/bash
IMAGE=$1

echo "Verifying signature..."
cosign verify --key cosign.pub $IMAGE || exit 1

echo "Checking provenance..."
PROVENANCE=$(cosign verify-attestation --key cosign.pub --type slsaprovenance $IMAGE | jq -r '.payload' | base64 -d | jq '.predicate.SLSA')
REPO=$(echo "$PROVENANCE" | jq -r '.metadata."https://mobyproject.org/buildkit@v1#metadata".vcs.source // empty | if type == "string" and (startswith("https://") or startswith("git@")) then . else "unknown" end')
COMMIT=$(echo "$PROVENANCE" | jq -r '.metadata."https://mobyproject.org/buildkit@v1#metadata".vcs.revision // empty | if type == "string" and length > 0 then . else "unknown" end')
echo "Built from repo: $REPO"
echo "Built from commit: $COMMIT"

echo "Checking vulnerabilities..."
VULNS=$(cosign verify-attestation --key cosign.pub --type vuln $IMAGE | jq -r '.payload' | base64 -d | jq '.predicate')
CRITICAL=$(echo $VULNS | jq '[.scanner.result.Results[]?.Vulnerabilities[]? | select(.Severity == "CRITICAL")] | length')
echo "Critical vulnerabilities: $CRITICAL"

if [ "$CRITICAL" -gt 0 ]; then
  echo "Image has critical vulnerabilities. Review before deploying."
  exit 1
fi

echo "All checks passed."
Part 10: Things to Know
Digest vs Tag: I want to hammer home that Signatures and Attestations are tied to the image digest (sha256:abc123), not the tag (v1). If you push a new image with the same tag, the old signatures don’t apply. This is intentional: tags are mutable, digests are not.
Registry support: Most registries support storing signatures and attestations as OCI artifacts as I mentioned earlier. Local registries (like the one we started) work too.
Transparency logs (Rekor): When you use keyless signing, the signature and the short-lived certificate are recorded in Rekor, a public transparency log run by Sigstore. Think of it as an append-only, tamper-evident ledger. Once an entry is in there, it can’t be modified or deleted.
Why does this matter? With keypair signing, trust is simple: you have the public key, you verify the signature. But with keyless signing there’s no long-lived public key. Instead, Rekor provides the proof: “this signature was created at this time, by this identity, and we recorded it.” If someone were to try to forge a signature or backdate one, Rekor would have no matching entry, and verification would fail.
I have not played around with Rekor nor Fulcio. I will post something about it whenever I get to it.
SBOM (Software Bill of Materials): Trivy can also generate SBOMs in SPDX or CycloneDX format. These list every package in your image. You can attach them as attestations too:
trivy image --format spdx-json --output sbom.json localhost:5000/myapp:v1
cosign attest --key cosign.key --predicate sbom.json --type spdxjson localhost:5000/myapp:v1
Notation vs Cosign: There’s another tool called Notation (from the CNCF Notary project). It does similar things to cosign but uses a different format. Cosign is more widely adopted in the cloud-native ecosystem and integrates better with Sigstore/SLSA. I have not played around with notary, and all the comparisons I found were a bit old. Like this one which points to this medium post from 4 years ago.
Part 11: Enforcing Image Signatures in Kubernetes with Kyverno
I want to make clear here that you can use whichever tool you want. I am going with kyverno.
Kyverno is a policy engine for Kubernetes that can verify image signatures at admission time, blocking pods with unsigned or untrusted images before they’re created.
Understanding Kyverno Image Verification APIs
Kyverno has two APIs for image verification:
-
ClusterPolicy with verifyImages - This is the legacy API that has entered formal deprecation as per the Kyverno 1.16 announcement. In Kyverno 1.17,
verifyImagesrules in ClusterPolicy only execute in background scan mode, not at admission time. After spending some trying to bend its behavior, I abandoned given that it’s getting deprecated anyways. -
ImageValidatingPolicy (v1) - This is the modern, recommended API for image verification that properly enforces at admission time.
TI am using ImageValidatingPolicy.
Known Issues in Kyverno 1.17.0
There are bugs in Kyverno 1.17.0 related to Rekor transparency log handling:
- Issue #10115: “Verify Images Sigstore Rekor ignoreTlog is ignored”. I know it’s 2 years old and closed, but I encountered similar behavior.
- PR #9957: “fix: add rekor opts to cosign certificate verification and make rekor url optional” (merged 2y ago but not working in 1.17.0)
The workaround: You must provide ctlog.url even when using insecureIgnoreTlog: true.
Step 1: Create the demo namespace
kubectl create namespace demo
Step 2: Install Kyverno 1.17.0
Download and modify the installation manifest to enable admission enforcement:
# Download the install manifest
curl -LO https://github.com/kyverno/kyverno/releases/download/v1.17.0/install.yaml

# Enable admission controller (default is disabled)
sed -i 's/\("admissions.enforcer\/disabled\\":\\"\)true\(\\"\)/\1false\2/' install.yaml

# Create the kyverno namespace first
kubectl create namespace kyverno

# Install Kyverno
kubectl create -f install.yaml
Wait for all Kyverno components to be ready:
kubectl get pods -n kyverno
# You should see admission-controller, background-controller, cleanup-controller, reports-controller

# Wait for all pods to be Running
kubectl wait --for=condition=Ready pods --all -n kyverno --timeout=120s
Step 3: Create the ImageValidatingPolicy
Get your public key content:
cat cosign.pub
You’ll see something like:
-----BEGIN PUBLIC KEY-----
MFkwEwYHKoZIzj0CAQYIKoZIzj0DAQcDQgAE...
-----END PUBLIC KEY-----
Create the policy:
cat > image-validating-policy.yaml <<'EOF'
apiVersion: policies.kyverno.io/v1
kind: ImageValidatingPolicy
metadata:
  name: verify-image-signature
spec:
  validationActions: [Deny]
  matchConstraints:
    resourceRules:
    - apiGroups: [""]
      apiVersions: ["v1"]
      operations: ["CREATE", "UPDATE"]
      resources: ["pods"]
    namespaceSelector:
      matchExpressions:
      - key: kubernetes.io/metadata.name
        operator: In
        values: [demo]
  matchImageReferences:
  - glob: "kcandidate/*"
  attestors:
  - name: cosign
    cosign:
      key:
        data: |
          -----BEGIN PUBLIC KEY-----
          MFkwEwYHKoZIzj0CAQYIKoZIzj0DAQcDQgAEbZUI2AQ80aX3xFmhFNWVZdIxnDyc
          lhYxd1gMJ/Rud4uEnJcMBn6zJobkH7HvE7AtgcmsMLwzp3ANvsXGxTP9iw==
          -----END PUBLIC KEY-----
      ctlog:
        url: https://rekor.sigstore.dev
        insecureIgnoreTlog: true
        insecureIgnoreSCT: true
  validations:
  - expression: >-
      images.containers.map(image, verifyImageSignatures(image, [attestors.cosign])).all(e, e > 0)
    message: Image signature verification failed
EOF
Important: Replace the public key content under key.data with your actual public key from cat cosign.pub.
Key configuration details:
validationActions: [Deny]- Block pods that fail validationmatchConstraints.namespaceSelector- Only applies to thedemonamespacematchImageReferences: - glob: "kcandidate/*"- Matches images from the kcandidate registry namespacectlog.url- Required even with insecureIgnoreTlog (Kyverno 1.17.0 bug)insecureIgnoreTlog: true- Skip Rekor transparency log verificationinsecureIgnoreSCT: true- Skip SCT (Signed Certificate Timestamp) verification
Apply the policy:
kubectl apply -f image-validating-policy.yaml
Verify the policy was created:
kubectl get imagevalidatingpolicy
kubectl describe imagevalidatingpolicy verify-image-signature
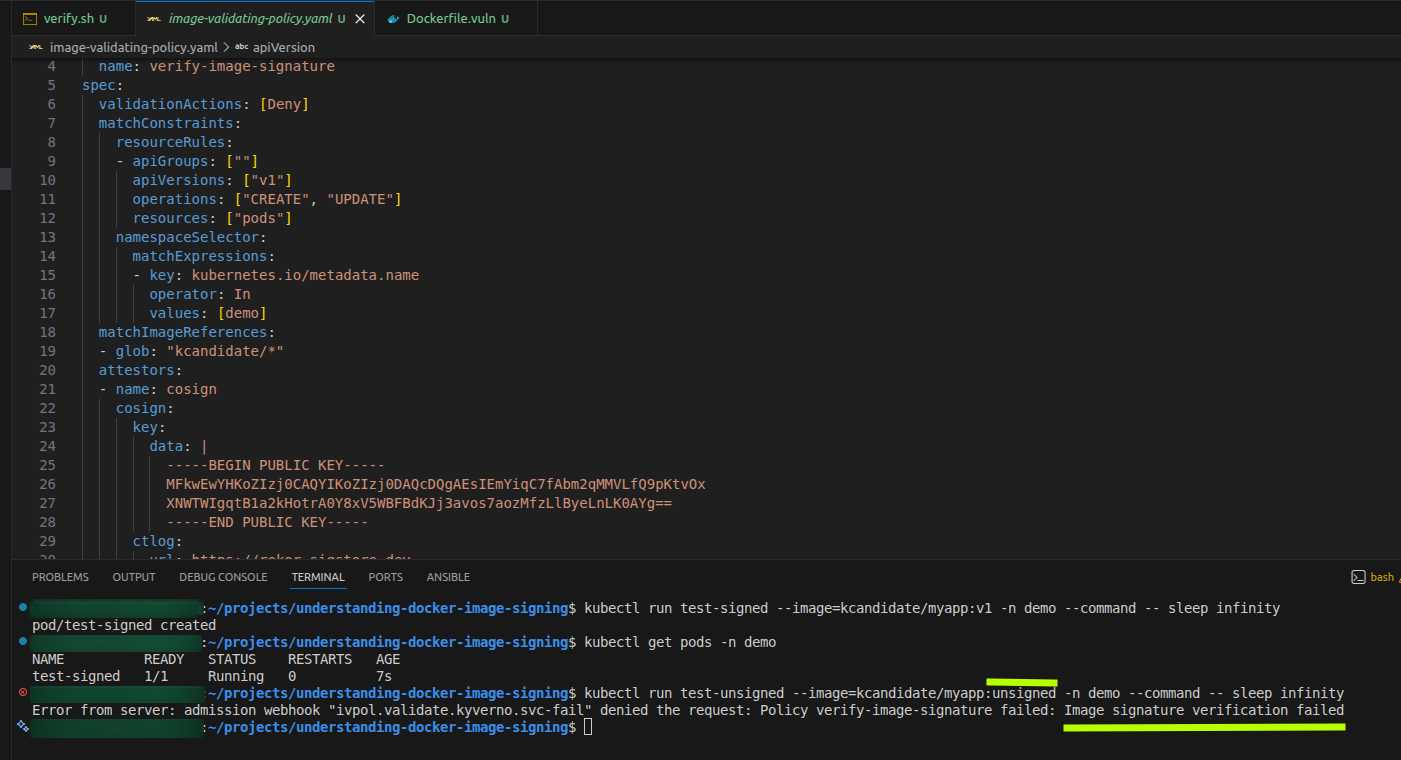
Step 4: Test with a signed image
Try to run a pod with the signed image:
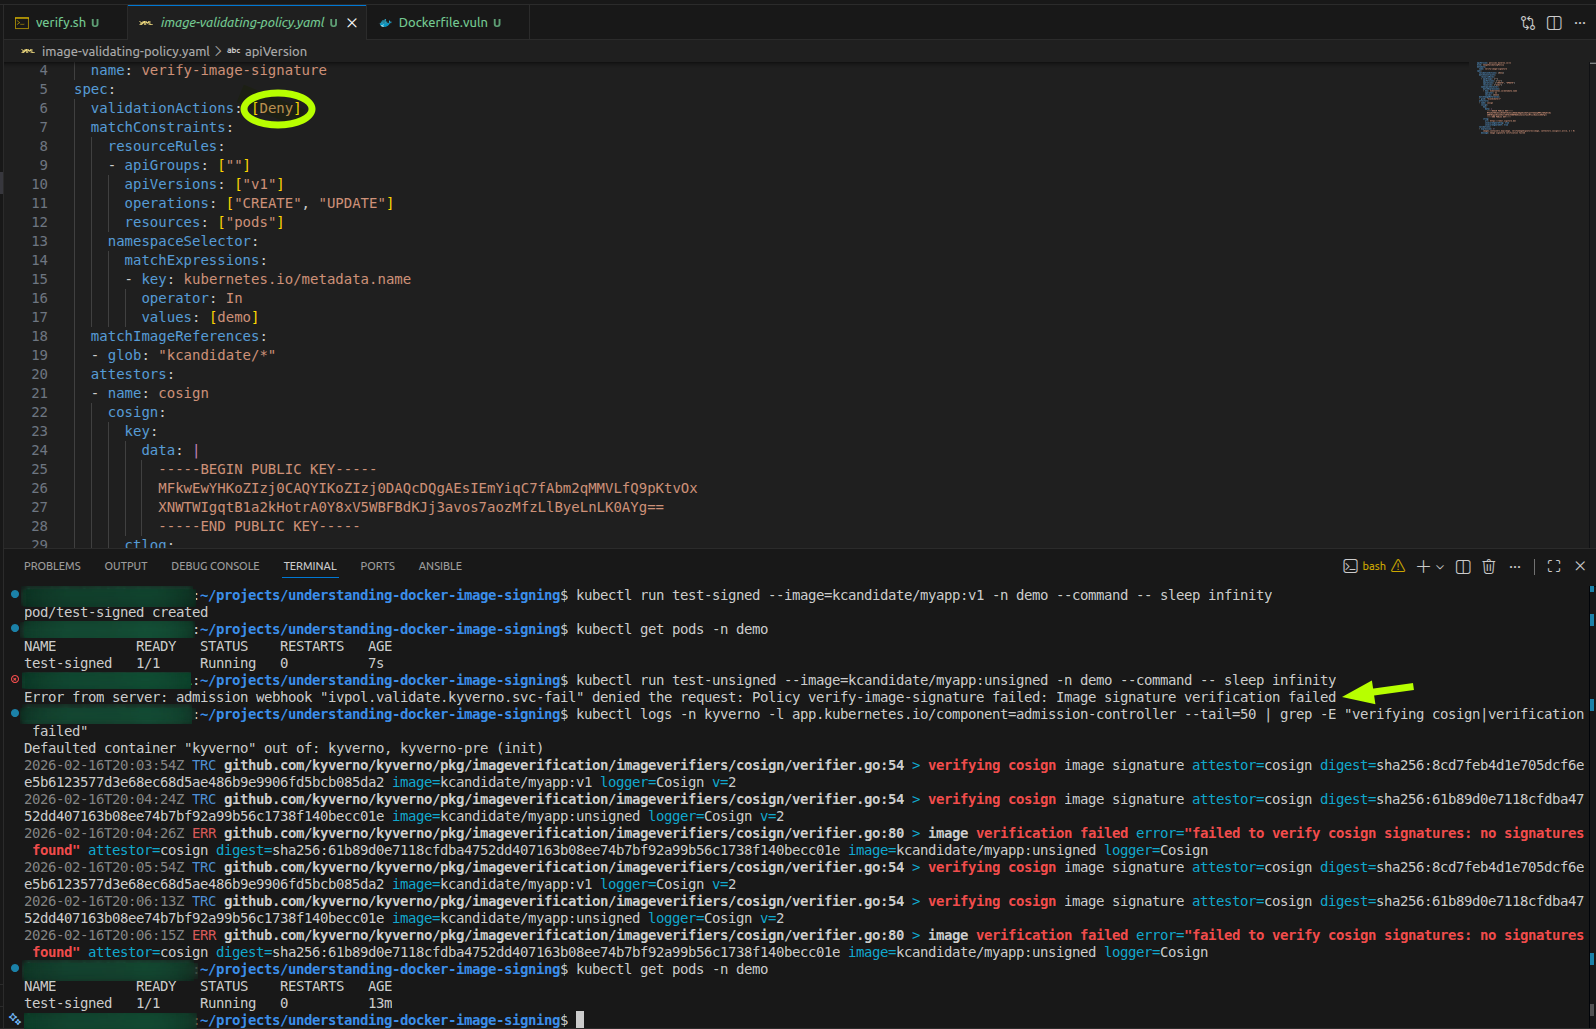
kubectl run test-signed --image=kcandidate/myapp:v1 -n demo --command -- sleep infinity
Check if the pod was admitted and is running:
kubectl get pods -n demo

# Expected output:
# NAME          READY   STATUS    RESTARTS   AGE
# test-signed   1/1     Running   0          10s
The pod should be created successfully because it has a valid signature.
Step 5: Test with an unsigned image
Try to run a pod with the unsigned image:
kubectl run test-unsigned --image=kcandidate/myapp:unsigned -n demo --command -- sleep infinity
This should be blocked with an error like:
Error from server: admission webhook "ivpol.validate.kyverno.svc-fail" denied the request:
Policy verify-image-signature failed: Image signature verification failed
The pod is rejected at admission time before it’s ever created.
Step 6: Verify policy enforcement
Check Kyverno admission controller logs:
kubectl logs -n kyverno -l app.kubernetes.io/component=admission-controller --tail=50 | grep -E "verifying cosign|verification failed"
You should see:
- Signed image (v1): Verification trace with no errors
- Unsigned image: Error “failed to verify cosign signatures: no signatures found”
Check the pods in the demo namespace:
kubectl get pods -n demo
Expected output:
NAME          READY   STATUS    RESTARTS   AGE
test-signed   1/1     Running   0          2m
Only the signed pod exists. The unsigned pod was never created.
Step 7: Cleanup
# Delete test pods
kubectl delete pod test-signed -n demo

# Delete the policy
kubectl delete imagevalidatingpolicy verify-image-signature

# Delete the demo namespace
kubectl delete namespace demo

# Optionally uninstall Kyverno
kubectl delete -f install.yaml
kubectl delete namespace kyverno
What just happened?
You’ve created a complete admission-time enforcement workflow:
- Build: Created two different images (Alpine-based and Ubuntu-based)
- Sign: Added a cryptographic signature to one image with cosign
- Publish: Pushed both images to the registry
- Enforce: Configured Kyverno to block unsigned images at pod admission time
Production Considerations
ImageValidatingPolicy vs ClusterPolicy:
- Use ImageValidatingPolicy for image verification in Kyverno 1.16+
- ClusterPolicy with
verifyImagesis deprecated and only runs in background scan mode (at least in my testing) - ImageValidatingPolicy properly enforces at admission time via webhooks
Rekor and Transparency Logs:
- I am using
insecureIgnoreTlog: trueto skip Rekor verification - In production with keyless signing, set
ctlog.urlto the Rekor instance and remove theinsecure*flags - This enables verification against the public transparency log
Key Management:
- Use different keys for different environments (dev, staging, prod)
- Rotate signing keys periodically
Policy Scope:
- Use namespace selectors to apply policies to specific namespaces
- Exempt system namespaces (
kube-system,kyverno) from verification - Start with
validationActions: [Audit]to test without blocking, then switch to[Deny]
Signing Methods:
- Keypair mode (what I am doing): Simple, works offline, requires key management
- Keyless mode (the other option to be aware of and explore if worth it in the future): OIDC-based, uses Fulcio certificates, records in Rekor, no long-lived keys, requires management of Rekor and Fulcio.
Beyond Signatures:
- Use the
attestationsfield in ImageValidatingPolicy to verify SBOM, vulnerability scans, and SLSA provenance. See doc here. - Implement policy for both signature verification AND attestation checks
- Set vulnerability thresholds (e.g., no CRITICAL CVEs allowed). It’s better to shift left and have it in the build pipeline: no signing if the image has vulns. This way you won’t have to deal with quirky kyverno policies. In the cluster you should be covered by runtime scanning.