QEMU Emulation: System-Level vs User-Mode - Running ARM64 on x86_64
QEMU supports both system-level and user-mode emulation.
They can both be used simultaneously. There’s no inteference between the two: they use different qemu binaries.
The steps below assume that libvirt, qemu, and virtual machine manager were already installed and working for x86_64 VMs (my case), and we just want to add arm64 support.
Emulation: System-Level vs User-Mode
| System Emulation | User-mode Emulation | |
|---|---|---|
| Scope | Emulates the entire ARM architecture (including cpu, memory and peripherals) | Runs single ARM64 binaries only, by translating ARM system calls to their x86_64 equivalents. More efficient for userspace apps that do not require kernel-level interactions. |
| Runs | Complete OS (kernel, drivers, userspace apps) | Individual apps, e.g. Docker containers |
| Binary | qemu-system-aarch64 | qemu-aarch64-static (+ binfmt) |
| Speed | Slow | Much faster |
System Emulation: ARM64 VM
-
Install the QEMU ARM emulator
sudo apt install qemu-system-arm
This will also pull the UEFI firmwareqemu-efi-aarch64andqemu-efi-arm. -
Get the cloud image.
But why the cloud image and not the live installer image? Emulation is already slow. The cloud image comes pre-installed and boots instantly to login. With the live iso installer we will have to spend a lot of time going through the installation. - Cloud-init ISO
cat > user-data << EOF #cloud-config users: - name: ubuntu plain_text_passwd: ubuntu123 sudo: ALL=(ALL) NOPASSWD:ALL EOF cat > meta-data << EOF instance-id: arm64-01 local-hostname: arm64-ubuntu EOF genisoimage -output seed.iso -volid cidata -joliet user-data meta-data -
Virt-manager > new vm > import existing disk image > architecture aarch64 > machine type virt > choose the img file > os generic > cpu 2 memory 4096 > name, network, check customize before install.
Notice the firmware: it is UEFI aarch64.
The cpu is cortex-a57 because it is the most stable.
add storage cdrom > choose seed.iso > boot options: check disk first, check cdrom second - Normal VM stuff (disk resizing etc)
User-Mode Emulation: ARM64 Docker
-
sudo apt install qemu-user-static
This will also installbinfmt-support -
Verify binfmt registration
ls /proc/sys/fs/binfmt_misc/ | grep qemu
We see hereqemu-aarch64. We’ll dig into it below. -
docker run --platform=linux/arm64 hello-world
qemu-aarch64 is what intercepts arm64 ELF binaries before the kernel tries to execute them.
- ELF (Executable and Linkable Format): standard file format for Linux executables. It’s like saying
.exeon Windows. First ~20 bytes identify cpu type (architecture). execve(): Linux system call to launch programs. Kernel reads ELF header to find CPU type (or crash on wrong arch).- Magic bytes: ELF signature (
\x7ELF\x02\x01...\xb7\x00) at file start. Kernel uses this to detect “this is arm64” vs “this is x86_64”. binfmt_misc: Linux kernel feature (kernel module) that registers cusom binary handlers. When weexecve()on arm64 ELF on x86_64 host, kernel sees the magic bytes, matchesqemu-aarch64entry, and redirects to/usr/bin/qemu-aarch64-staticinstead of crashing with “Exec format error”.
docker run --platform=linux/arm64 hello-world
# |
# |  execve arm64 ELF
# |  kernel reads \x7ELF\x02\x01...\xb7\x00 → "This is arm64"
# V
kernel binfmt_misc: "Oh, qemu-aarch64 owns this magic"
# |
# |  kernel invokes (or hands off to) qemu-aarch-static
# V
qemu-aarch-static
# |
# |  qemu translates arm64 instructions to x86_64,
# |  via TCG (Tiny Code Generator)
# V
Hello from Docker (arm64v8)
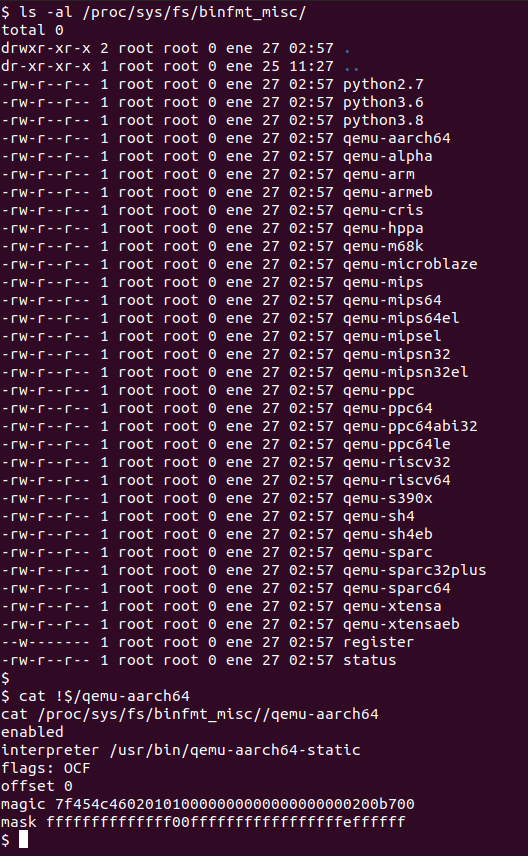
We can see in the screenshot the magic bytes and the mask which correspond to https://github.com/qemu/qemu/blob/f26976b9d30496d28bd4fd045f4300706e567a29/scripts/qemu-binfmt-conf.sh#L99-L101.
Resources
- https://wiki.qemu.org/Documentation/Platforms/ARM
- https://translatedcode.wordpress.com/2016/11/03/installing-debian-on-qemus-32-bit-arm-virt-board/
- https://translatedcode.wordpress.com/2017/07/24/installing-debian-on-qemus-64-bit-arm-virt-board/
- https://www.systemonchips.com/running-arm-aarch64-linux-on-x86-64-host-using-qemu-challenges-and-solutions/
- https://www.kernel.org/doc/html/latest/admin-guide/binfmt-misc.html
- https://lwn.net/Articles/631631/
- https://github.com/multiarch/qemu-user-static/
- https://en.wikipedia.org/wiki/List_of_file_signatures
- https://en.wikipedia.org/wiki/Binfmt_misc
- https://dev.to/asacasa/how-to-set-up-binfmtmisc-for-qemu-the-hard-way-3bl4
- https://github.com/qemu/qemu/blob/f26976b9d30496d28bd4fd045f4300706e567a29/scripts/qemu-binfmt-conf.sh#L99-L101